As the new academic year gets under way, we will be looking at some new features available in Echo360 which are now available to staff. Echo360 is one of King’s College’s core technologies (read more about our core technologies) and is used for Lecture Capture platform which is used to record live lectures.
Echo360 can also be used to create video content on your desktop using your webcam and microphone and can also record your screen. For full guidance on using the features described here, please refer to the links at the bottom of this post.
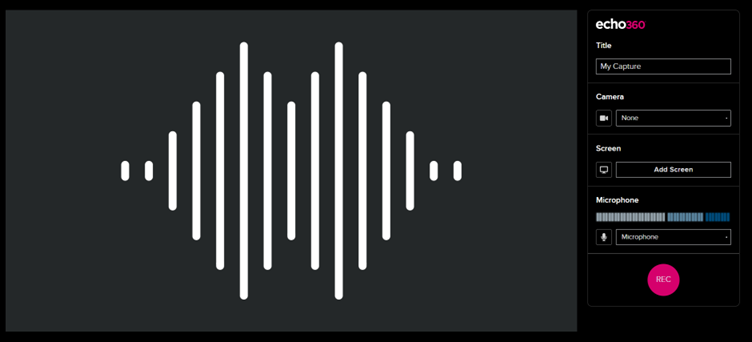
Browser Capture
Until recently, the only way to create a desktop recording using Echo360 was to download and install Universal Capture to your computer. Browser Capture allows staff to create a desktop recording without the need for additional software, using their browser. Browser Capture allows you to record your screen, webcam video and audio.
What are the Pros and Cons of Browser Capture?
The main advantage of using Browser Capture is that it doesn’t require installing additional software. Other pros include the ability to record just one application or window on your computer, or a specific browser tab, none of which are on option via Universal Capture. However, unlike Universal Capture, you cannot create recordings if you are offline, so you will need an active internet connection whilst recording.
Advanced Editing
Echo360 have introduced advanced editing options, including:
- The ability to remove segments from your recording
- The ability to insert other media in your recording
- The ability to remove or add tracks from your recording
Removing Segments of a Recording
This new feature allows users to remove a segment of a recording, including one from the middle of a recording. This is useful if you have a break during your lecture, or if students undertake group discussion, which is not useful to have as part of your recording. Once you are in the video editor, you will see a new option to Split Clip via the play head menu.
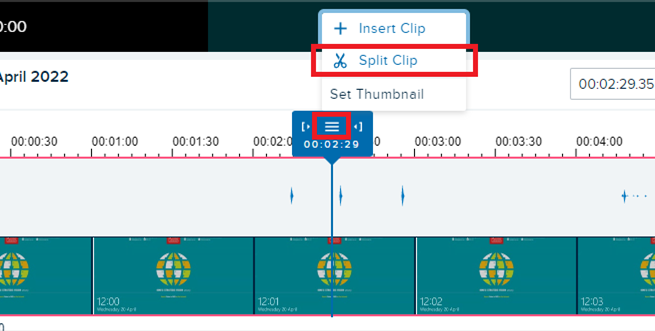
Using this on both ends of the segment that you want to remove will allow you to delete it.
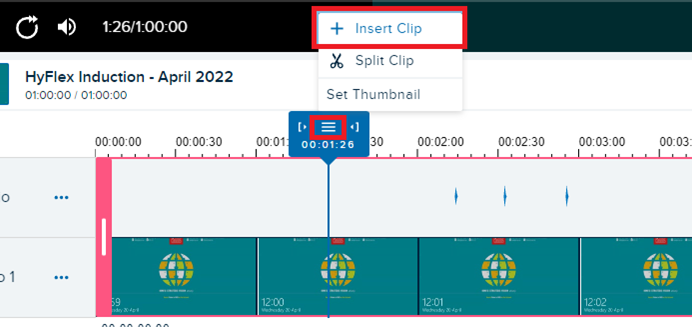
Insert Other Media in a Recording
It may be useful to insert other media into your recording, for instance if you want to record an introductory video for your lecture and have it be part of the recording, or if there are challenging parts of your lecture content that you want to expand on after it’s taken place. In the Echo360 video editor, click on Insert Clip as shown, you will then be prompted to add the clip via your Echo360 library.
Remove or Add Tracks
A track is a particular element of your recording, such as the audio, a camera feed showing the Lecturer, or the screen recording. The ability to remove a track may be useful if the camera feed was part of your recording, but you later decide that you want to remove that element. You can remove a track by accessing the editor, clicking on the 3 dots next to the track you want to remove and clicking on Remove Track.
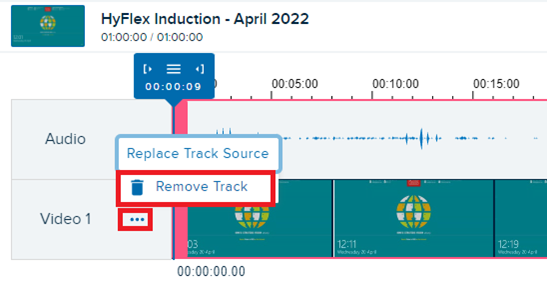
Similarly, you can add tracks to your recording that will play alongside the existing tracks. To do this, access the editor, click on the Actions dropdown menu and select Add A Track. You will then be prompted to add the track from your Echo360 Library.

Note: You can only have a total of 3 tracks in one recording, so if you already have 3 then you won’t be able to add a new track until one is deleted.
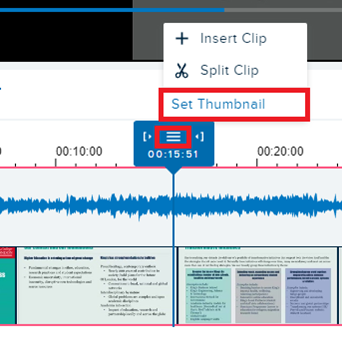
Customising Video Thumbnails
A thumbnail is the preview image of your recording. You may choose to change this to something that better summarises the content of your recording. For instance, you can select a frame from your recording that shows a slide that shows a summary of what will be covered, or you can create an image to upload as your new thumbnail.
You can grab a new thumbnail from your recording by navigating to the part of the recording showing the slide/video that you want to use and selecting Set Thumbnail on the play head menu and following the remainder of the on-screen prompts.
For full guidance on using this feature, including how to upload a thumbnail from your computer, please refer to the link below under further guidance.
Further Guidance
Please note following links are accessible only for King’s staff:
- Using Browser Capture
- Accessing the Editor
- Remove Segments of a Recording
- Insert Other Media in a Recording
- Remove or Add Tracks
- Customise the Thumbnail
Written by Fariha Choi
Fariha Choi is a Learning Technologist in the Centre for Technology Enhanced Learning and has been with CTEL since June 2021. She has a particular interest in educational multimedia and has worked as a Learning Technologist, eLearning Developer and Learning and Development Manager for the past 11 years.