Comparing Scratch, Alice and Greenfoot

logosAt ITiCSE 2009 and again at SIGCSE 2010, we had panel session: Comparing Alice, Greenfoot and Scratch. The session came about because all three development teams – the Scratch, Alice and Greenfoot teams – were regularly asked one question: What’s the difference?

All three systems aim to let young people learn about programming. Many teachers (as well as parents or kids) have heard of more than one of them, but deciding which one to use can be difficult. While there are clear differences, the time it takes to evaluate all three of them is not trivial.

The panel session turned out to be very popular. The room was packed full, and we got plenty of questions afterwards. So we decided to create a written version of this session. And it’s now available.

We wrote a set of papers, which have now been published in a special issue of the ACM Transactions of Computing Education (TOCE). Each paper was written by a key member of the design team of one of the environments. The papers are more extensive and more in depth than the panel was (we all took the chance to write about various aspects our systems, which we had intended for some time, but never got around to doing), but they also aim to record some of the discussion that we had at the time.

Target age groups for Alice, Scratch and Greenfoot

The TOCE special issue consists of an introduction, three papers (one each) about the three environments, and a discussion section at the end. They are


(NOTE: All papers are available in the ACM digital library. ACM allows authors to also publish the papers on their own web sites. I will link to those freely available copies when they have been made available by the authors. So check back in a little while if you could not get all you were interested in.)

Greenfoot wins 2010 Premier Award

We are very happy to hear that Greenfoot was awarded the 2010 Premier Award for Excellence in Engineering Education Courseware, a prize given to systems that show “high-quality, engaging, non-commercial learning innovations designed to enhance engineering education.”

Two systems are chosen annually by Engineering Pathway to receive the Premier Award, a prize that marks outstanding contributions in engineering software. Ian and Davin from our team made the trip to the Frontiers in Education Conference in Washington, D.C., to receive the award at a special “Premier Award Ceremony”.

This is the second award that Greenfoot has received (after winning the Duke’s Choice Award in 2007). But, of course, we don’t do all this for the awards. We just do it for all the the fame and money…

You can Save The World

Earlier today I wrote about the new Greenfoot features. I forgot one: Saving the world.

In previous editions of Greenfoot, there was one annoying aspect: every time you had to recompile your classes, your interactively created objects disappeared. (This was not a bug: it is necessary, because the class implementing these objects does not exist anymore.)

This could be overcome by writing an initialiser method in the world class that creates and inserts all the objects you want to have in the world. This solves the problems, since objects get recreated automatically. However, writing these initialiser methods can be tedious.

So we come to the rescue: Saving the World.

You can now insert the objects you initially want in the world interactively, and then save the visible state of the world as the starting state of your program. Let’s look at an example.

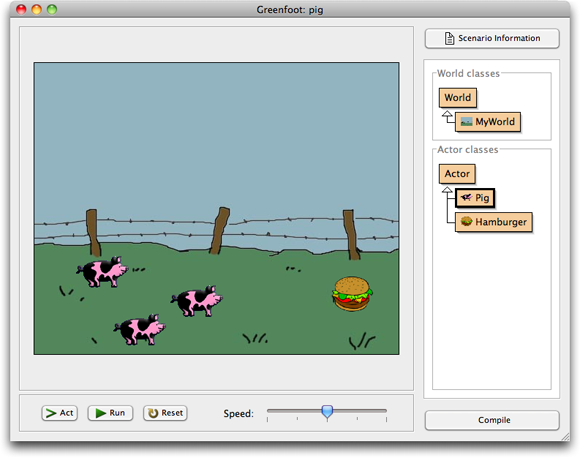
Let us assume I want a scenario where the initial objects at the start of the game are a hamburger and three pigs. (Don’t ask). Let us further assume that I have just created the pigs and the hamburger interactively and placed them into my world. Figure 1 shows my world at this stage.

Figure 1: Three pigs and a hamburger

This is all well so far – with the problem that the actors will disappear (and I have to manually recreate them) after every compile.

Enter Save the World.

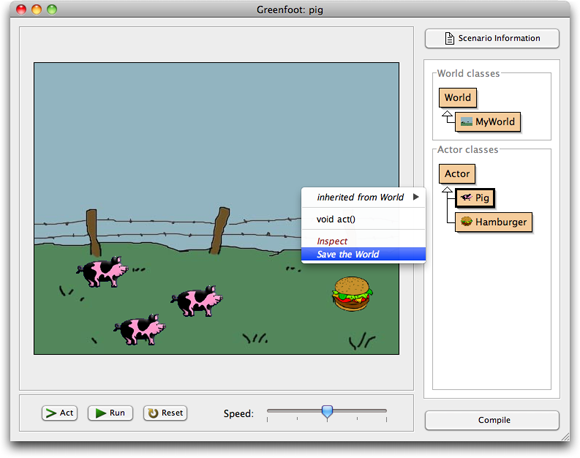
In Greenfoot 2.0, I can now select Save the World from the world context menu (Figure 2).

Figure 2: Saving the world

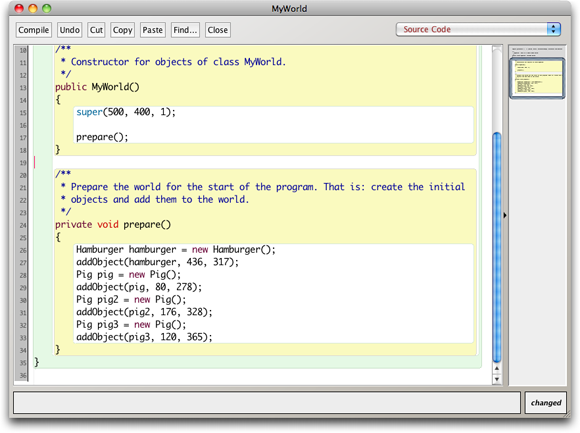
When I choose this function, Greenfoot writes the source code for a method called “prepare” into the class of the world object. This method contains code to create and insert objects just as they are in the world, and a call to this method from the world constructor (Figure 3).

Figure 3: The generated 'prepare' method

The effect is that next time, when I recompile my class and the world is re-created, the objects in the world are re-created as well. The status of the world is saved.

There are a few characteristics worth noting about this mechanism:

  • We consciously chose to create source code (rather than, say, serialising the world objects) because it can serve as a good learning instrument. Students can study the generated code and learn from it.
  • The source code of the automatically generated ‘prepare’ method may be freely edited by hand. There is not much special about this method, and you are welcome to adapt it in the editor in any way you feel like.
  • When the world was already saved, and you save it again, the prepare method will be adapted appropriately.
  • The prepare method will include code to recreate exactly what you did to construct the world. For example, if you create and place an object, and then move it, the prepare method will add the object at first at the same position where you first added it, and then move it. This is necessary, because the sequence may have had side effects. If you are only interested in the final position, you can streamline the prepare method manually by editing it (and taking out any unnecessary calls).
  • After the scenario has run, the world cannot be saved anymore.

(All screenshots in this post are produced by the author and are hereby placed in the public domain.)

Greenfoot 2.0 – The new features

Yes! It’s here! It’s out!

Greenfoot 2.0 has just been released. After a lot of hard work, and about a month behind schedule, we finally completed the work on Greenfoot 2.0. Even though it may not be immediately obvious, this is one of the largest updates we have ever produced for Greenfoot. A lot of work has been done internally, and users will discover the effects of many of them over time.

Greenfoot splash screen

The Greenfoot 2.0 splash screen

New features are available in the editor, for processing and recording sound, for editing images, debugging your programs, and more. Here, I will summarise the most interesting changes (at least those that users can directly see – there are many internal improvements to performance and stability that I won’t discuss here).

The first thing users will notice after upgrading is a new splash screen. (Yes, we are now supported by the good folks at Oracle, instead of Sun Microsystems, after Sun was swallowed up by Oracle.)

But after that, it all might look rather underwhelming at first. The Greenfoot main window looks pretty much as it used to look before. “Where’s the new stuff?”, I hear you ask. Sharp-eyed users may notice one small change: the world name, that used to be shown above the world in the main window, is not there anymore.

The name of the world used to serve as a placeholder to represent the world object itself. It had a right-click functionality, that let you access the world object’s context menu to invoke instance methods on the world object itself. The problem was that this functionality was quite hidden, and many users never discovered it. It was bad UI design, since nothing in the name indicated that this was clickable. It had, in fact, almost easter egg-like quality.

We have now removed this name, and instead made the whole world area right-clickable. Right-clicking the world itself (or indeed the grey background behind it) will show the world object context menu and lets you invoke the world methods.

main window

The main window

Right-clicking in the world itself is more natural (more conforming to user expectations and more discoverable) and we expect that users will find this menu more easily now. (By the way, the reason that this was not done like this in the first place is that early versions of Greenfoot had different functionality attached to mouse clicks in the world.)

The next thing many users will discover is the new look of the editor.

The new editor

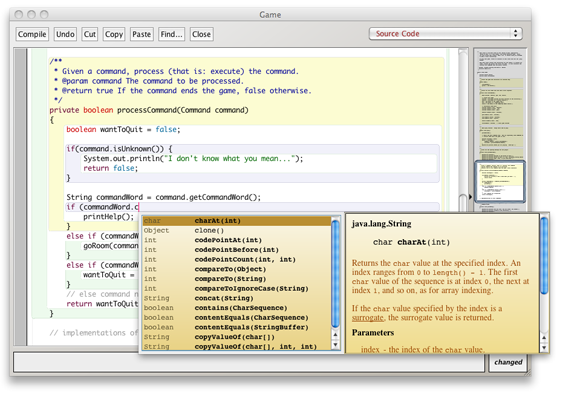
Greenfoot now incorporates the same editor that is used in BlueJ since the BlueJ 3.0 release earlier this year. The new features include scope highlighting, a new navigation view, better Find and Replace and code completion. (Code completion is activated by pressing Ctrl-Space.) I have described these features in more detail in an earlier blog post, when they came out with BlueJ – read them there if you want to know more..

greenfoot editor

The new Greenfoot editor

We expect that the new editor, especially the availability of code completion for Greenfoot API calls, will be a substantial improvement to the user experience. (I have been using it for a few months now, and I wouldn’t want to work without it anymore!)

Sound recording

sound recorder

The sound recorder

Greenfoot now has a built-in sound recorder. It can be found in the Controls menu, and you can now record your sounds directly from within Greenfoot. The functionality is very simple — just recording and trimming is supported — but this is what you need most of the time. If you want more sophisticated sound editing, you can still use third party applications (such as Audacity). However, the built-in recorder should be sufficient in many cases.

There is unfortunately a Java bug that cases problems with sound recording on some USB connected microphones. It works, however, with most microphones, and we hope that the remaining problems will be fixed in a future Java update.

But sound recording is not all that’s new with sound. You now also have more control over sound playback.

MP3 support

Yes, mp3 support! Greenfoot can now play mp3 files! Really. So go on and write your first MP3 player.

The GreenfootSound class

In previous Greenfoot versions, programmers had little control over how sounds are played. They could be started, but that’s all. Now, Greenfoot has a new class called GreenfootSound. It has method for starting, stopping and pausing sounds, as well as looping. This makes working with sounds much more flexible.

For short, simple sounds (such as sound effects), the Greenfoot.playSound(…) method is still the best to be used. But if you need more sophisticated functionality, create a GreenfootSound object and you can control the sound in more detail.

The debugger

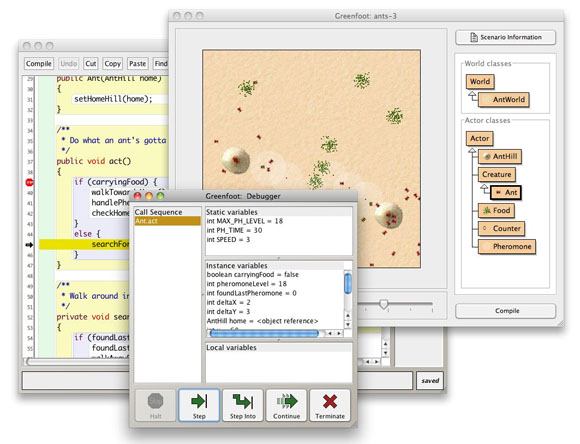
Greenfoot now has a debugger built in. As some of you had discovered before, the code for the debugger has been there under the hood for some time (and there were ways to make it come up), but it was not working well, not supported, not finished, and had no proper interface.

debugger window

The Greenfoot debugger

Now you can open the debugger window from the menu, set breakpoints, stop the execution, single step through your programs and monitor your variable values. Especially for illustrating the working of control structures, this should be a useful help.

Image editing

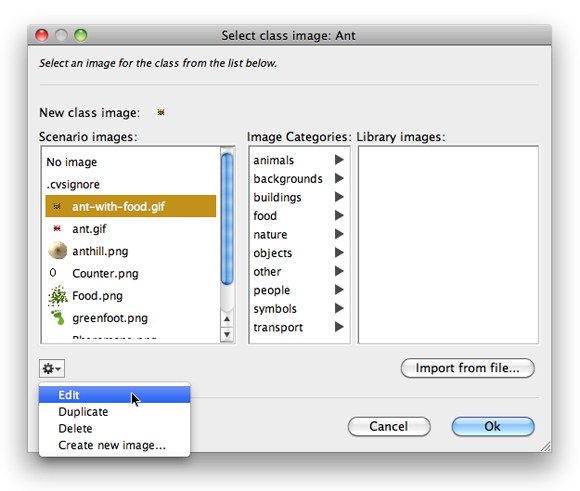
Creating or editing images is a task that is very often part of developing Greenfoot scenarios. Now you can start creating or editing images directly from within the Greenfoot image dialogue.

image editing

Editing images

The action menu under the image list offers functions to edit, delete or create an image. This will happen in external applications. By default, Greenfoot will open the default application for the chosen file type on any platform. This behaviour can also be configured to select a specific application. (I will write in more detail about some of these new functions in separate posts soon – I’ll discuss how to do this then.)

When images are created, they are automatically placed into the scenario’s images folder, so that they are immediately available for use in Greenfoot.

Unbounded worlds

The last bit of functionality I’ll talk about today are unbounded worlds.

As you know (if you have used Greenfoot in the past), actors cannot leave the world. When they try to move beyond world boundaries they are simply placed at the edge of the world. Breaking out is impossible for them. This has good reason: if actors were to leave the visible world, it can be very hard to get them back. You cannot interact with them anymore, and you don’t really know where they are. In fact, you may not even be aware that they are still there. This has great potential of confusion and difficulty for beginners.

This behaviour remains the default in Greenfoot 2.0 — but you can now configure your world to allow actors to leave the visible area for specific scenarios, should you want to do that. (And we know that some of you do: many of you have asked for this for some time!)

The world is then essentially infinite in all directions, and the visible world in the Greenfoot window is just a viewport into a small part of this eternal universe.

The World superclass now has a second constructor that allows the bounds to be removed:

Constructor Summary
World(int worldWidth, int worldHeight, int cellSize)
Construct a new world.
World(int worldWidth, int worldHeight, int cellSize, boolean bounded)
Construct a new world.

The first constructor is as before. Thus, you old code will work unchanged. For example, a world constructor

public AntWorld()
{
    super(500, 400, 1);
}

will work as before and create the usual bounded world. However, you can now also use

public AntWorld()
{
    super(500, 400, 1, false);
}

In this case, actors will be allowed to leave the visible world and walk as far away as they like. For some type of games this will be very useful. When out of the visible world, they will still act, cause collisions, etc. You just cannot see them.

And so…

So, plenty of new stuff in Greenfoot 2. The last thing to tell you is where to get it. And that is, of course, where it has always been: www.greenfoot.org.

Install it, take it for a spin, and let us know what you think. We’d love to get your feedback. Bug reports, of course, but also things you like. You comments are one of the inputs that drive our future development.

And most of all, as always: Have fun programming!

Update:

I forgot to mention one new feature: Saving the world. I have now described this in a separate blog post.

Greenfoot on Twitter

Twitter logoIn a bold attempt to keep up with the times, and trying to not appear to be the bunch of old dinosaurs which we actually are (in internet age, at least), Greenfoot is now on Twitter.

None of us really knows very much about this, but apparently this is what one does nowadays. So now you have the unique chance to follow the GreenfootTeam and find out first hand why releases are delayed, bugs pop up, and how software somehow still gets released eventually.

Scratch, Alice, Greenfoot—What’s the difference?

Do you remember the feeling when you were a kid and you had the fantastically rare chance to go into a sweet shop (or, as the Americans among us would probably say: candy store), and you actually had a bit of money, and you could buy something, and there was just so much choice? Wow.

(I still get a similar feeling now – not so much with candy, but with chocolates. Hmmm, chocolate…)

This is what it seems like with educational programming software. Some ten years ago there was not very much around (at least not much that was in widespread use and had good resources), and now there is plenty. For a teacher of introductory programming, it’s a bit like being the kid in the sweet shop: So much here to look at, so much good stuff. But so hard to choose!

If you haven’t used any of the current educational programming environments before, it’s hard to get your head around what’s in them. Just like the well known box-of-chocolates problem. When I talk about Greenfoot, I often get the question “How does it compare to Scratch?” or “How is it different from Alice?”

To help a little with that situation, we organised a panel session at the last SIGCSE conference called Comparing Alice, Greenfoot and Scratch which compared these three environments. “We”, in this context, were Sally Fincher and Ian Utting who organised the session, and Steve Cooper (Alice), John Maloney (Scratch) and myself (Greenfoot) presenting the environments. I really enjoyed the session – it was great to get one of the leading people involved in each of the development teams to present the environments, and it was well received: the room was packed full and the feedback was good.

But panels are transient – no good record is available for those who were not there. So we are now working on a series of articles for a special issue of the Transactions on Computing Education doing the same in writing. They should be published together in a single issue later this year, and include a paper on each of the three environments and a discussion section where we talk about commonalities and differences.

To read it, you have to wait until it comes out. But as a teaser, here is a graphic that we made for the papers, showing the target age groups for each of the three systems.

Target age groups for Alice, Scratch and Greenfoot

Maybe this answers one of your questions already. For everything else, you’ll have to wait a little longer.

Workshops for SIGCSE due soon – Greenfoot?

A couple of days ago I received an email calling for workshop proposals for SIGCSE 2011.

I have given Greenfoot workshops there for the past few years (and BlueJ workshops before that). Now I am wondering whether I should do the same again.

I am definitely planning to propose a Greenfoot workshop, but I am uncertain about the level that I should aim at. Should I do the same beginners’ workshop (for people who haven’t seen Greenfoot before) or is it maybe time to do an advanced one to help people move forward who have seen the basics of Greenfoot?

I just received the feedback from this year’s workshop, and it was certainly popular. I got really nice, very positive comments (someone wrote “This was exactly the “killer app” that I had hoped to run across at this conference” – thanks!). So that workshop works well as it is. And the fact is without a doubt that the majority of participants at SIGCSE do not know Greenfoot.

On the other hand, we want to support our users. Teachers who have adopted Greenfoot in the past couple of years might like some further tips and opportunity for discussion.

At this stage I am undecided. I will have to make my mind up in the next couple of weeks. If you have an opinion – let me know.

Greenfoot book out now in German

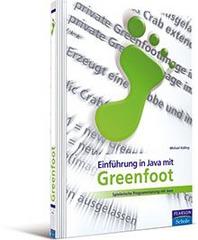
Now in German: Greenfoot!

The Greenfoot book, which teaches Java programming and object orientation with the Greenfoot environment, is now available in German (as well as the original English).

That’s great news: Germany is probably the country with most Greenfoot users outside the English speaking world, and having the book in German will make use of the book – be it adoption in the classroom or casual reading by hobbyists – much easier.

I have just received my copy, and it looks great. The publisher has done a great job with full colour printing and good quality paper.

The translation is great, too – it was done by Carsten Schulte from the Freie Universität Berlin. I was really lucky that the publisher found such an excellent translator. It shows that he’s a computer scientist and an educator as well. His deep understanding of the concepts has clearly led to a much better translation than someone without subject knowledge could have produced.

I’m happy to see it out, and to see it end up looking this nice.

BlueJ 3.0 – What’s new

We’ve been working on it for the last eight months, and now it’s finally here: BlueJ 3.0.

Version 3.0 of BlueJ includes the most significant set of updates to BlueJ functionality since version 2.0 was released in 2004. (Yes – 2004! That was when we had no Google maps, no Facebook, no Twitter. It’s really that long ago…)

It might be good to summarise the most important of them.

The one thing that many people will notice first is an interface update:

The BlueJ 3.0 main window

The BlueJ 3.0 main window

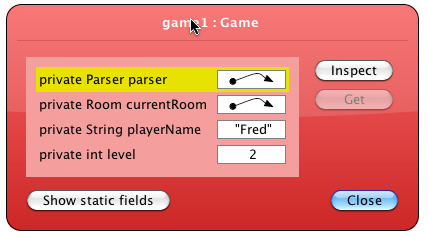
The interface had a slight update and polish. Nothing too significant – we aimed at providing a slightly more modern appearance while still retaining the instantly recognisable “BlueJ look”. As part of the interface update, object inspectors have also changed in looks:

An object inspector

An object inspector

The inspector now looks like a magnified version of an object on the object bench. This emphasises that this is just another view of the same thing (just with additional detail provided).

The functionality of the object inspector is unchanged: fields can still be inspected further, static fields can be displayed, and so on.

The main changes in BlueJ 3.0, however, are not its looks. Our main effort has gone into improving the editor.

The BlueJ editor has always been fairly simple. 10 years ago, when it was originally written, it was simple and mainstream. Today, it was just embarrassingly simple.

Davin McCall, one of our senior developers on the BlueJ team, has implemented a new parser for BlueJ that forms the basis for much of the new editor functionality that you can see in 3.0, and also for some future features that will appear over the next few months. The most interesting of the new editor features are:

  • Scope highlighting,
  • the navigation view, and
  • code completion.

Let’s briefly look at them.

Scope highlighting

We have added background colouring to the editor to highlight scopes:

The new BlueJ 3.0 editor

The highlight makes it easier to see when brackets are missing or mismatched, and thus makes some errors more obvious. It hopefully helps students understand the concept of nested scopes.

The Navigation View

The Navigation View

The Navigation View

To the right of the editor is the “Navigation View”.

The navigation view shows a miniature version of the full class text, and highlights the currently selected viewport.

It is usable like a scroll bar: The view can be dragged, clicked, moved with a mouse wheel, etc. This gives a better overview over a source file for easier navigation.

When the mouse hovers over the navigation view, tool tips show relevant method names – this makes jumping to specific methods quicker than before.

The idea for the navigation view is taken from the “Fluid Source Code Editor” by Michael Desmond, which I saw presented at the PPIG workshop by Chris Exton.

Code completion

One of the most contentious non-features of BlueJ was, and always has been, code completion.

Almost from the very beginning, when BlueJ 1.0 was released in 1999, people have asked for code completion. Other people have been tearing their hair out in horror at the mere mention of the possibility of code completion ever being added to BlueJ. The discussions at the First Vatican Council were just a chat over coffee in comparison.

In the past, we have sided with the contra faction. (Okay, I admit: we have pretty much led the contra faction.)

But, as Konrad Adenauer, the first German post-war chancellor, said: “Was kümmert mich mein Geschwätz von gestern”.

Fact is: we have always aimed at providing tools that can be taken for granted in all reasonably modern development environments. 10 years ago, this included compilers and debuggers, but not code completion.

Code completion, back then, was still a “cool feature” that only a few high end environments provided. We did not want to create reliance on a feature that might be absent later in other environments, which meant that students could not look up documentation competently.

This has now clearly changed. Code completion is now a standard feature in mainstream environments, and the arguments against using it have grown weaker than my grandmother’s bed time cup of tea.

So, in short: code completion is finally here.

Code completion

In the BlueJ editor: code completion

In contrast to other environments, the code completion pane does not pop up automatically, but has to be activated explicitly (Ctrl-Space, by default). This means that the code completion function will not pop up unexpectedly and frighten beginners into spilling their Dr Pepper over their keyboards.

And wait, there’s more…

There is more good stuff to find in the latest BlueJ release. If you are interested, have a look at the BlueJ change log or — better still — download it and give it a run around the block.

You might like it.

(Images in this post are produced by the author and are hereby placed in the public domain.)

The Greenroom is open

Our Greenfoot project has been going well for a while. The software has been stable for a couple of years now, whenever we presented it we got excellent feedback, and user number have steadily grown (to about 20,000 downloads a month at the moment).

There was, however, one big gaping hole: easy availability of good teaching material. Educational software in itself actually has very little impact – no matter how good it is – if there is not also teaching material available that teachers can easily take and use.

The first step in addressing this was the writing of the Greenfoot textbook. This is done now and was published last year. But we wanted to go a step further. So now we have:

The Greenroom

The Greenroom is a community web site, where teachers can find and share teaching material, discuss ideas or problems, and communicate with each other and the Greenfoot development team.

We have adopted a wiki-style ownership model for teaching resources on that site: Instead of resources being owned by their original creator (as is the case in other resource repositories), here they are owned by “the community”.

Of course, proper credit is given to the creator (and all other contributors), but any resource is editable by anyone on the site. We hope that this may lead to collaborative development of resources. Maybe someone has a worksheet that they can upload, others can improve is, add exercises, translate it to other languages, or add ideas.

Resources may even be just an initial project idea, where another Greenroom member then might take up the idea and develop a small project, someone else might add exercises, and so on.

The idea of this style of collaborative development is quite ambitious, and it is not at all clear whether it will work. But one can always hope!

So far, the beginnings are looking promising: We opened the Greenroom less than three weeks ago, and so far there are already more than 200 teachers subscribed, and more than 20 different resources available. I am carefully optimistic.

In future, we plan to extend the Greenroom to add more local information, so that members can see groups and events in their local area that might be relevant to them.

Let’s see where it goes. For now, I just find it exciting to watch how people start to communicate in the Greenroom.