Multiple levels in Greenfoot games

A demo scenario

Yesterday I announced that a new Greenfoot version is available (version 2.1). Over the next few days, I’ll go through some of the new features and introduce them briefly here. This is the first one: the setWorld(…) method.

The Greenfoot class now has a method with the following signature:

setWorld (World world)

This method takes a world object as a parameter, and it will show that world in the Greenfoot main window.

This allows you to have multiple World subclasses (in my example called Level1 and Level2). You can then dynamically (that is: while your program is running) create and install other world objects. These other worlds can show entirely different scenes, such as other levels.

Two world subclasses, representing different levels.

For example, to go to Level 2, you could use the following statement:

   Greenfoot.setWorld(new Level2());

Of course, the same initialisation applies as usual: If the Level2 world creates and inserts some actors in it’s constructor, this will all happen.

One thing to keep in mind, though, is that this will – if you don’t do anything clever – create new actors. So, if you have a game character in level 1, an then you add a game character to level 2, you will have a new character object. If you stored some state (e.g. a score) in the instance variables of that actor, it will be gone. If you want to preserve the state of your game character, make sure you carry the actor object across without creating a new one.

An example showing this new functionality in action is now on the Greenfoot Gallery, here.

Greenfoot 2.1 released

We have just released Greenfoot version 2.1.0.

This update of Greenfoot includes a good number of bug fixes, so if there is something that has bugged you for a while, give the new version a go and see whether it’s improved. (If not, tell us!)

But, more importantly, this version also includes some new functionality. The new features include:

  • A new sound API for volume control. This means Greenfoot scenarios can programmatically adjust the volume of sound clips. Several people have asked for this, especially aiming at fading sounds in and out nicely.
  • A new input function: getMicLevel. This function returns the noise level from the system microphone. This makes it very easy to write soem very simple early interactive examples.
  • Support for multiple worlds. Greenfoot now has a function to dynamically show different world objects. This makes it much easier to develop games with different levels.
  • Built-in move and turn methods. Actors in Greenfoot now have turn(int) and move(int) methods which turn and move relative to the current rotation.
  • UI changes. Finding out how to share your scenario on the Greenfoot Gallery has been made much easier. We suspect that many users previously never discovered this important function.

So, surf over to the Greenfoot download page and give it a go. Let us know what you think.

Over the next few days, I will add a few blog posts here that introduce and explain the new functionality in more detail. So check back soon!

Part 1: Using setWorld to create multiple game levels.

Use the Microsoft Kinect with Greenfoot

Those of you who know Greenfoot know that one of its aims is to make programming for beginners exciting and engaging. (Those of my readers who don’t know it should have a look here.)

The most recent addition to Greenfoot is a library that allows programmers to easily use the Microsoft Kinect module with their Greenfoot scenarios. This means that you can now write simple Greenfoot games that are controlled by players body movements.

Probably the easiest way to show what I mean, is to show you what I mean. Here’s a short video:

Programming the Kinect with Greenfoot is probably the easiest way to write programs with the Kinect module. Neil Brown, one of our developers on the Greenfoot team, has adapted open source server software that communicates with the Kinect and designed and implemented a Greenfoot library that makes access surprisingly simple.

If you are interested to try it yourself — here are the detailed instructions. But beware: you might stand in the middle of your room waving your arms around for the next few days! Some people might look at you strangely, but it’s great fun.

Sharing of teaching resources – it’s about people, not about stuff

iconAt the beginning of April this year, we opened a new web site: the Greenroom.

The Greenroom is a web site where teachers who teach with Greenfoot can share resources and have discussions. It was clear for a while that sharing of resources was a powerful thing that was urgently needed for the Greenfoot community. Greenfoot is different from many other environments, teaching with it requires different projects and different ideas, and thus getting started with it, as a new teacher, is challenging. Having a community to talk to, to ask questions, to get ideas, to get tried and tested material, makes a huge difference.

Yet, this is a space where many have failed.

It is often said, with only slight exaggeration, that there are more teaching resource repositories than there are teaching resources. The fact is, countless resource repositories have been created, and most of them have tumbleweed blowing down the main street.

The typical pattern is this: A repository is opened, a flurry of activity follows, resources are submitted (often by the creators and other people personally involved or contacted), and then it dies down. A few months later, little is happening, resources are not maintained, few new resources are added, you can hear the cold wind blowing through empty spaces.

A high profile example is the repository of resources on the ACM SIGCSE website (one of the largest organisations in computer science education). It was – as far as I know – opened in early 2004, and initially attracted a good number of submissions. However, this quickly died down. Looking at the recent submissions, it seems that only four resources were submitted in all of 2008. This went down to three in 2009, with one single submission (so far) in 2010.

Now, I don’t want to pick on that one particular repository specifically. This pattern is not unsusual. I am pointing to it here as a typical example. Making repositories thrive is hard. (We have recently published a paper about this.) So, when we designed the Greenroom, we were very worried about meeting the same fate: spending a whole lot of effort in creating a repository site, only to have it die a slow, quiet death after a few short months.

I am happy to say that we seem to have avoided that fate. The Greenroom is alive and well.

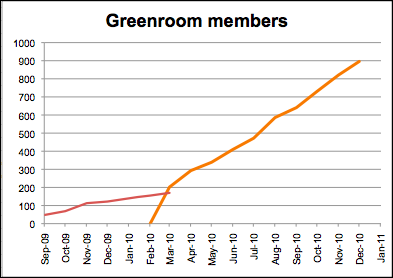
From September 2009 to March 2010, the Greenroom existed as a Google Group. This gave us an excellent discussion forum, and quite poor storage of resources. Over these first six months, about 170 people signed up. Then, at the end of March 2010, we finished our custom implementation of the new Greenroom, and we were amazed at the result: even though only half of the Google Groups subscribers moved over, we surpassed the old subscriber numbers within two weeks, and then they continued to climb. Now, after eight months, we have about 900 people signed up. Lots of resources have been posted, and many interesting discussions are going on.

subscriber graph

Subscriber numbers of the Greenroom; old (red) and new (orange)

So, what makes this site work, when so many others have failed?

I think, in building such a site, you need to address a number of questions:

  • Who is allowed to upload resources? Everyone, or only trusted people?
  • How do you ensure quality? By prior review (work-intensive, hard), or do you let everything in (and risk flooding by poor quality, untried material)?
  • Do you restrict access? (If only teachers can access, you can also post exercises with solutions, exams, etc. But then you need verification.)
  • How do you maintain the resources? Who looks after them?
  • Do you store local copies of resources (which may go out of date) or links to outside resources (which may break)?
  • How do you organise searching and browsing? This requires relating resources to each other – who does that work?

And most importantly:

  • How do you make people come and submit interesting material, and participate in interesting discussions?

I think there are some design choices you can make to address many of these things. As a result, we have built a repository site that is quite different from others. We decided to not use a standard platform (because they only gave us the same old stuff that we didn’t want) and build our own from scratch. The main design choice, which makes most of the difference is this:

The site must be about people, not about stuff.

So we designed a site that is primarily about community, and then about material. There are many design details that embody this idea:

  • The main page of the site shows activities of people, not lists of things.
  • People sign up to the site, and have an ongoing relationship with it. It’s not something where you go once every two years when you redesign your course, it’s a place where interesting things are happening every week or maybe even every day.
  • People sign up with their real names, and are encouraged to post profile pictures. In the Greenroom, you move in a community of peers, not in a big, anonymous black hole.
  • The mental model is that of a staff room in a school, not of a library. It’s about meeting people, not about searching through piles of stuff.
  • Submitting unfinished resources is welcomed. We all know that most things never get finished – submitting something is better than submitting nothing.
  • The resources are owned by the community, not by single people. The edit rights follow a wiki model: everyone can edit everything. (I remember the moment in our design discussions when Neil Brown, one of our team members, suggested this. This changed almost everything. Many of the questions posted above are affected by this. Like many good ideas, it seems obvious in retrospect, but wasn’t at the time.)
  • Small contributions are welcome. Linking some related resources, for example, is a good thing. It’s quick, anyone can do it, and the wiki model allows everyone to do it.

In short: I think people should re-think teaching repository design. It has worked for us. (More details about this are in our paper.) There is daily activity in the Greenroom, many people visit regularly, we have frequent interesting discussion in our forum, and a large number of excellent resources. It has been going much better than we dared to hope.

So, if you think about designing a resource repository, think about the people, not about things. And if you are a teacher interested in Greenfoot, join the Greenroom. There are many friendly people there happy to help.

Comparing Scratch, Alice and Greenfoot

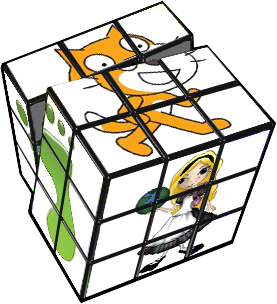
logosAt ITiCSE 2009 and again at SIGCSE 2010, we had panel session: Comparing Alice, Greenfoot and Scratch. The session came about because all three development teams – the Scratch, Alice and Greenfoot teams – were regularly asked one question: What’s the difference?

All three systems aim to let young people learn about programming. Many teachers (as well as parents or kids) have heard of more than one of them, but deciding which one to use can be difficult. While there are clear differences, the time it takes to evaluate all three of them is not trivial.

The panel session turned out to be very popular. The room was packed full, and we got plenty of questions afterwards. So we decided to create a written version of this session. And it’s now available.

We wrote a set of papers, which have now been published in a special issue of the ACM Transactions of Computing Education (TOCE). Each paper was written by a key member of the design team of one of the environments. The papers are more extensive and more in depth than the panel was (we all took the chance to write about various aspects our systems, which we had intended for some time, but never got around to doing), but they also aim to record some of the discussion that we had at the time.

Target age groups for Alice, Scratch and Greenfoot

The TOCE special issue consists of an introduction, three papers (one each) about the three environments, and a discussion section at the end. They are


(NOTE: All papers are available in the ACM digital library. ACM allows authors to also publish the papers on their own web sites. I will link to those freely available copies when they have been made available by the authors. So check back in a little while if you could not get all you were interested in.)

Greenfoot wins 2010 Premier Award

We are very happy to hear that Greenfoot was awarded the 2010 Premier Award for Excellence in Engineering Education Courseware, a prize given to systems that show “high-quality, engaging, non-commercial learning innovations designed to enhance engineering education.”

Two systems are chosen annually by Engineering Pathway to receive the Premier Award, a prize that marks outstanding contributions in engineering software. Ian and Davin from our team made the trip to the Frontiers in Education Conference in Washington, D.C., to receive the award at a special “Premier Award Ceremony”.

This is the second award that Greenfoot has received (after winning the Duke’s Choice Award in 2007). But, of course, we don’t do all this for the awards. We just do it for all the the fame and money…

You can Save The World

Earlier today I wrote about the new Greenfoot features. I forgot one: Saving the world.

In previous editions of Greenfoot, there was one annoying aspect: every time you had to recompile your classes, your interactively created objects disappeared. (This was not a bug: it is necessary, because the class implementing these objects does not exist anymore.)

This could be overcome by writing an initialiser method in the world class that creates and inserts all the objects you want to have in the world. This solves the problems, since objects get recreated automatically. However, writing these initialiser methods can be tedious.

So we come to the rescue: Saving the World.

You can now insert the objects you initially want in the world interactively, and then save the visible state of the world as the starting state of your program. Let’s look at an example.

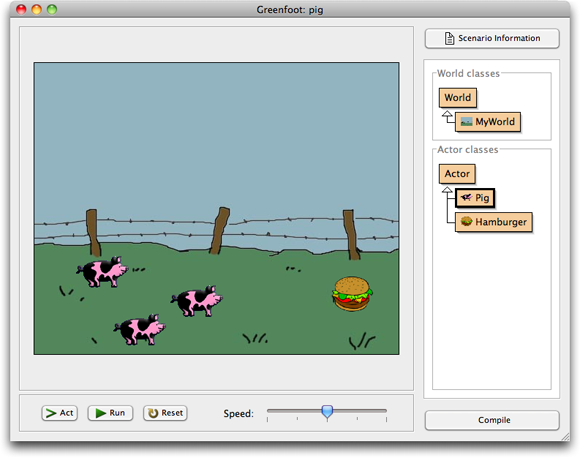
Let us assume I want a scenario where the initial objects at the start of the game are a hamburger and three pigs. (Don’t ask). Let us further assume that I have just created the pigs and the hamburger interactively and placed them into my world. Figure 1 shows my world at this stage.

Figure 1: Three pigs and a hamburger

This is all well so far – with the problem that the actors will disappear (and I have to manually recreate them) after every compile.

Enter Save the World.

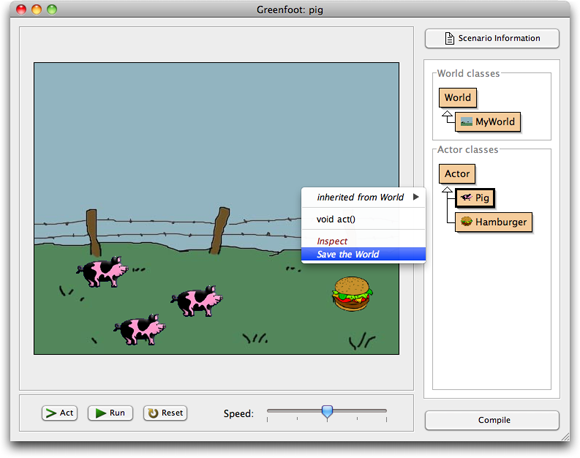
In Greenfoot 2.0, I can now select Save the World from the world context menu (Figure 2).

Figure 2: Saving the world

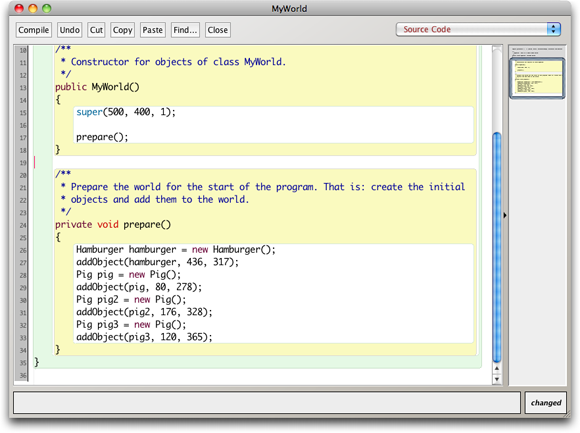
When I choose this function, Greenfoot writes the source code for a method called “prepare” into the class of the world object. This method contains code to create and insert objects just as they are in the world, and a call to this method from the world constructor (Figure 3).

Figure 3: The generated 'prepare' method

The effect is that next time, when I recompile my class and the world is re-created, the objects in the world are re-created as well. The status of the world is saved.

There are a few characteristics worth noting about this mechanism:

  • We consciously chose to create source code (rather than, say, serialising the world objects) because it can serve as a good learning instrument. Students can study the generated code and learn from it.
  • The source code of the automatically generated ‘prepare’ method may be freely edited by hand. There is not much special about this method, and you are welcome to adapt it in the editor in any way you feel like.
  • When the world was already saved, and you save it again, the prepare method will be adapted appropriately.
  • The prepare method will include code to recreate exactly what you did to construct the world. For example, if you create and place an object, and then move it, the prepare method will add the object at first at the same position where you first added it, and then move it. This is necessary, because the sequence may have had side effects. If you are only interested in the final position, you can streamline the prepare method manually by editing it (and taking out any unnecessary calls).
  • After the scenario has run, the world cannot be saved anymore.

(All screenshots in this post are produced by the author and are hereby placed in the public domain.)

Greenfoot 2.0 – The new features

Yes! It’s here! It’s out!

Greenfoot 2.0 has just been released. After a lot of hard work, and about a month behind schedule, we finally completed the work on Greenfoot 2.0. Even though it may not be immediately obvious, this is one of the largest updates we have ever produced for Greenfoot. A lot of work has been done internally, and users will discover the effects of many of them over time.

Greenfoot splash screen

The Greenfoot 2.0 splash screen

New features are available in the editor, for processing and recording sound, for editing images, debugging your programs, and more. Here, I will summarise the most interesting changes (at least those that users can directly see – there are many internal improvements to performance and stability that I won’t discuss here).

The first thing users will notice after upgrading is a new splash screen. (Yes, we are now supported by the good folks at Oracle, instead of Sun Microsystems, after Sun was swallowed up by Oracle.)

But after that, it all might look rather underwhelming at first. The Greenfoot main window looks pretty much as it used to look before. “Where’s the new stuff?”, I hear you ask. Sharp-eyed users may notice one small change: the world name, that used to be shown above the world in the main window, is not there anymore.

The name of the world used to serve as a placeholder to represent the world object itself. It had a right-click functionality, that let you access the world object’s context menu to invoke instance methods on the world object itself. The problem was that this functionality was quite hidden, and many users never discovered it. It was bad UI design, since nothing in the name indicated that this was clickable. It had, in fact, almost easter egg-like quality.

We have now removed this name, and instead made the whole world area right-clickable. Right-clicking the world itself (or indeed the grey background behind it) will show the world object context menu and lets you invoke the world methods.

main window

The main window

Right-clicking in the world itself is more natural (more conforming to user expectations and more discoverable) and we expect that users will find this menu more easily now. (By the way, the reason that this was not done like this in the first place is that early versions of Greenfoot had different functionality attached to mouse clicks in the world.)

The next thing many users will discover is the new look of the editor.

The new editor

Greenfoot now incorporates the same editor that is used in BlueJ since the BlueJ 3.0 release earlier this year. The new features include scope highlighting, a new navigation view, better Find and Replace and code completion. (Code completion is activated by pressing Ctrl-Space.) I have described these features in more detail in an earlier blog post, when they came out with BlueJ – read them there if you want to know more..

greenfoot editor

The new Greenfoot editor

We expect that the new editor, especially the availability of code completion for Greenfoot API calls, will be a substantial improvement to the user experience. (I have been using it for a few months now, and I wouldn’t want to work without it anymore!)

Sound recording

sound recorder

The sound recorder

Greenfoot now has a built-in sound recorder. It can be found in the Controls menu, and you can now record your sounds directly from within Greenfoot. The functionality is very simple — just recording and trimming is supported — but this is what you need most of the time. If you want more sophisticated sound editing, you can still use third party applications (such as Audacity). However, the built-in recorder should be sufficient in many cases.

There is unfortunately a Java bug that cases problems with sound recording on some USB connected microphones. It works, however, with most microphones, and we hope that the remaining problems will be fixed in a future Java update.

But sound recording is not all that’s new with sound. You now also have more control over sound playback.

MP3 support

Yes, mp3 support! Greenfoot can now play mp3 files! Really. So go on and write your first MP3 player.

The GreenfootSound class

In previous Greenfoot versions, programmers had little control over how sounds are played. They could be started, but that’s all. Now, Greenfoot has a new class called GreenfootSound. It has method for starting, stopping and pausing sounds, as well as looping. This makes working with sounds much more flexible.

For short, simple sounds (such as sound effects), the Greenfoot.playSound(…) method is still the best to be used. But if you need more sophisticated functionality, create a GreenfootSound object and you can control the sound in more detail.

The debugger

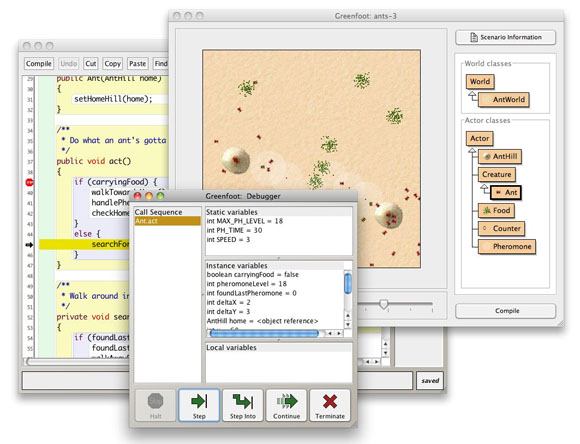
Greenfoot now has a debugger built in. As some of you had discovered before, the code for the debugger has been there under the hood for some time (and there were ways to make it come up), but it was not working well, not supported, not finished, and had no proper interface.
debugger window

The Greenfoot debugger

Now you can open the debugger window from the menu, set breakpoints, stop the execution, single step through your programs and monitor your variable values. Especially for illustrating the working of control structures, this should be a useful help.

Image editing

Creating or editing images is a task that is very often part of developing Greenfoot scenarios. Now you can start creating or editing images directly from within the Greenfoot image dialogue.
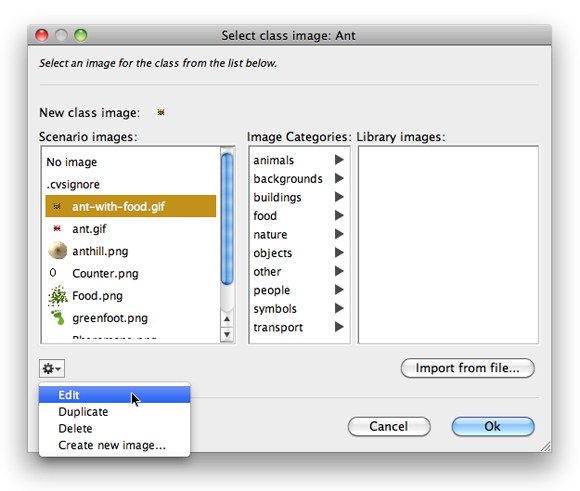
image editing

Editing images

The action menu under the image list offers functions to edit, delete or create an image. This will happen in external applications. By default, Greenfoot will open the default application for the chosen file type on any platform. This behaviour can also be configured to select a specific application. (I will write in more detail about some of these new functions in separate posts soon – I’ll discuss how to do this then.)

When images are created, they are automatically placed into the scenario’s images folder, so that they are immediately available for use in Greenfoot.

Unbounded worlds

The last bit of functionality I’ll talk about today are unbounded worlds.

As you know (if you have used Greenfoot in the past), actors cannot leave the world. When they try to move beyond world boundaries they are simply placed at the edge of the world. Breaking out is impossible for them. This has good reason: if actors were to leave the visible world, it can be very hard to get them back. You cannot interact with them anymore, and you don’t really know where they are. In fact, you may not even be aware that they are still there. This has great potential of confusion and difficulty for beginners.

This behaviour remains the default in Greenfoot 2.0 — but you can now configure your world to allow actors to leave the visible area for specific scenarios, should you want to do that. (And we know that some of you do: many of you have asked for this for some time!)

The world is then essentially infinite in all directions, and the visible world in the Greenfoot window is just a viewport into a small part of this eternal universe.

The World superclass now has a second constructor that allows the bounds to be removed:

Constructor Summary
World(int worldWidth, int worldHeight, int cellSize)
Construct a new world.
World(int worldWidth, int worldHeight, int cellSize, boolean bounded)
Construct a new world.

The first constructor is as before. Thus, you old code will work unchanged. For example, a world constructor

public AntWorld()
{
    super(500, 400, 1);
}

will work as before and create the usual bounded world. However, you can now also use

public AntWorld()
{
    super(500, 400, 1, false);
}

In this case, actors will be allowed to leave the visible world and walk as far away as they like. For some type of games this will be very useful. When out of the visible world, they will still act, cause collisions, etc. You just cannot see them.

And so…

So, plenty of new stuff in Greenfoot 2. The last thing to tell you is where to get it. And that is, of course, where it has always been: www.greenfoot.org.

Install it, take it for a spin, and let us know what you think. We’d love to get your feedback. Bug reports, of course, but also things you like. You comments are one of the inputs that drive our future development.

And most of all, as always: Have fun programming!

Update:

I forgot to mention one new feature: Saving the world. I have now described this in a separate blog post.

Greenfoot on Twitter

Twitter logoIn a bold attempt to keep up with the times, and trying to not appear to be the bunch of old dinosaurs which we actually are (in internet age, at least), Greenfoot is now on Twitter.

None of us really knows very much about this, but apparently this is what one does nowadays. So now you have the unique chance to follow the GreenfootTeam and find out first hand why releases are delayed, bugs pop up, and how software somehow still gets released eventually.

Scratch, Alice, Greenfoot—What’s the difference?

Do you remember the feeling when you were a kid and you had the fantastically rare chance to go into a sweet shop (or, as the Americans among us would probably say: candy store), and you actually had a bit of money, and you could buy something, and there was just so much choice? Wow.

(I still get a similar feeling now – not so much with candy, but with chocolates. Hmmm, chocolate…)

This is what it seems like with educational programming software. Some ten years ago there was not very much around (at least not much that was in widespread use and had good resources), and now there is plenty. For a teacher of introductory programming, it’s a bit like being the kid in the sweet shop: So much here to look at, so much good stuff. But so hard to choose!

If you haven’t used any of the current educational programming environments before, it’s hard to get your head around what’s in them. Just like the well known box-of-chocolates problem. When I talk about Greenfoot, I often get the question “How does it compare to Scratch?” or “How is it different from Alice?”

To help a little with that situation, we organised a panel session at the last SIGCSE conference called Comparing Alice, Greenfoot and Scratch which compared these three environments. “We”, in this context, were Sally Fincher and Ian Utting who organised the session, and Steve Cooper (Alice), John Maloney (Scratch) and myself (Greenfoot) presenting the environments. I really enjoyed the session – it was great to get one of the leading people involved in each of the development teams to present the environments, and it was well received: the room was packed full and the feedback was good.

But panels are transient – no good record is available for those who were not there. So we are now working on a series of articles for a special issue of the Transactions on Computing Education doing the same in writing. They should be published together in a single issue later this year, and include a paper on each of the three environments and a discussion section where we talk about commonalities and differences.

To read it, you have to wait until it comes out. But as a teaser, here is a graphic that we made for the papers, showing the target age groups for each of the three systems.

Target age groups for Alice, Scratch and Greenfoot

Maybe this answers one of your questions already. For everything else, you’ll have to wait a little longer.