
The third part of my endeavours to write a Dr Who computer game with my daughter

If you’re reading this, then you probably already have an idea what this is about: An ongoing project to write a Dr Who-themed computer game with my daughter Sophie, who is 10 years old. (Yes, she’s 10 now – it was her birthday earlier this week!)
This is the third part of this story. In part I we got the Doctor to move, and in part II we added some Daleks. This time, we giving the Doctor something to do, something worthy of the last of the Time Lords: Collecting energy pellets for the TARDIS.
![]()
So, it was time for another programming session with Sophie. We hadn’t done anything with the game for a week, other than talk about possible stories and plot lines a few times. One thing Sophie had decided on over time was this: There should be multiple levels in the game. What we are doing right now is the first level, and the Doctor uses the TARDIS to get to the next level.
 (A short interlude for those readers who are not intimately familiar with the Doctor, Daleks, Cybermen, Time Lords, etc.: The TARDIS is the Doctor’s ship. He uses it to travel – in a somewhat uncontrolled manner – through time and space. For some reasons – it’s a long story… – the TARDIS has the form of a London Police Call Box. And it’s bigger on the inside…)
Anyway, we decided that the TARDIS has run out of energy. The task for the Doctor is to collect energy pellets. When he has collected enough of them, he can go to the TARDIS and travel to the next level.
So far, so easy.
So Sophie and I sat down at the computer again (Sophie at the keyboard, and I watching from the sidelines), and fired up Greenfoot with the DrWho scenario. When we had a look at where we left off last time (Daleks moving back and forth over the screen, the Doctor running around between them) Sophie didn’t like the fact that the Daleks did not switch around when they changed direction. So first, she decided to make the Dalek image switch.
The good thing about this is that we had done something very similar before: we had also made the Doctor’s image switch with his direction.
This neatly introduces the overall theme of this session: Practice of what we’ve seen before.
This time, I did not introduce anything really new in terms of concepts or syntax. We are at a stage now where we can achieve quite a bit with what we have seen. So we just used constructs and techniques that we had seen in previous sessions, and applied them differently.
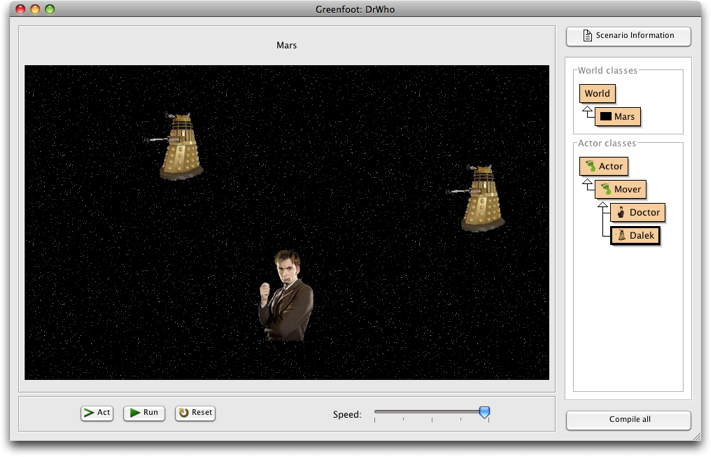
The great thing about this was that Sophie could do most of it pretty much on her own, with much less help and instruction than before. But let’s do that one step at a time. The game we started with looked something like this:
The Daleks were facing left, even when they moved right. So we mirrored the Dalek image (using Photoshop) and saved it into the scenario’s images folder under the name ‘dalek-right.png‘.
Then, we had a look at the code for the Doctor, and Sophie found the instruction that changed the image. It was
setImage("dr-right.png");
The Dalek’s act method contained this code:
   if (movingLeft)
   {
       moveLeft() ;
       if (atWorldEdge())
       {
           movingLeft = false;
       }
   }
   else
   {
       moveRight();
       if (atWorldEdge())
       {
           movingLeft = true;
       }
   }
So I asked Sophie where the setImage instruction should go, and she worked out that it should be within the inner if statements. We then got this:
   if (movingLeft)
   {
       moveLeft() ;
       if (atWorldEdge())
       {
           setImage("dalek-right.png");
           movingLeft = false;
       }
   }
   else
   {
       moveRight();
       if (atWorldEdge())
       {
           setImage("dalek.png");
           movingLeft = true;
       }
   }
 Actually, this is not quite true. Sophie first got the two images the wrong way around, so that the Dalek then always went backwards, but that was interesting, too, and she managed to fix that easily then. The version shown above is the corrected version.
Next, we wanted to make energy pellets. So I suggested to Sophie to make another class now for this. She looked at the diagram of the classes we already had, and asked: “Should they be a Mover, or just an Actor?”
I thought that was fantastic! She had clearly understood the subclass relationship as a specialisation (an is-a relation) and was thinking about the right things. We agreed that the pellets would not move, so Sophie created them as a subclass of Actor.
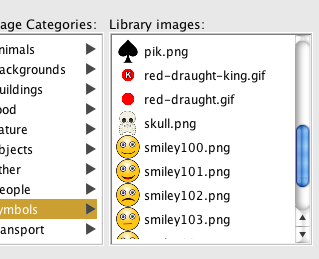
The class creation dialogue in Greenfoot lets you choose an image for the class, so she browsed through the available images for a while. While she was looking around there, she discovered an image of a skull, and she was quite excited, and said: “Look, there’s a skull! We can use that later. Then the Doctor is not allowed to step on it, or he dies!”
 I have seen this before: just looking at the available images often seems to set off new ideas about things one could do. The power of images.
After a little browsing, Sophie chose an image of a reddish round thing, and we had our EnergyPellet class. We could now immediately compile and place some energy pellets into the world to see what it looked like.
It looked quite okay. Not bad at all.
So, next came the task to make the Doctor collect the pellets. Again, we had done something quite similar before: We had code in the Dalek to remove the Doctor when they ran into him. So we only had to adapt that code for the Doctor to remove the pellets when he ran into them.
After I pointed out that the Dalek code is quite similar to what we need, Sophie quite easily managed to copy and then modify the code for the Doctor:
   if ( touches (EnergyPellet.class))
   {
       remove (EnergyPellet.class);
       Greenfoot.playSound("exterminate.wav");
   }
We decided to leave the counting for later, and just remove the pellets for now. Later, we want to add a counter so that we know how many we have collected.
This worked really well, except that it now shouted “EXTERMINATE” when the Doctor picked up a pellet – that’s not right. So we also needed a new sound.
Sophie this time wanted to use a real Doctor Who sound (with David Tennant’s voice – that 10th Doctor – that’s the one she knows). And he should say something like “Got it!” or “Hurrah!” or “YES!!” or some such thing. So we then spent the next 20 minutes searching the internet for Doctor Who sound files. There are quite a lot actually (and we may use some later) but there was nothing usable for this situation. So we decided to make our own again.
We went back to Audacity, and Sophie recorded herself saying “Got it!”. The idea was to then change the pitch to make the voice lower. Doing this, it still sounded nothing like the Doctor. But playing around with it a little, we discovered that making the pitch higher, while still nothing like the Doctor, sounded quite funny. So we gave up on trying to emulate David Tennant’s voice and just went for funny.
We saved the sound in the “sounds” folder and changed the code to use it. Quite straight forward – no problems here.
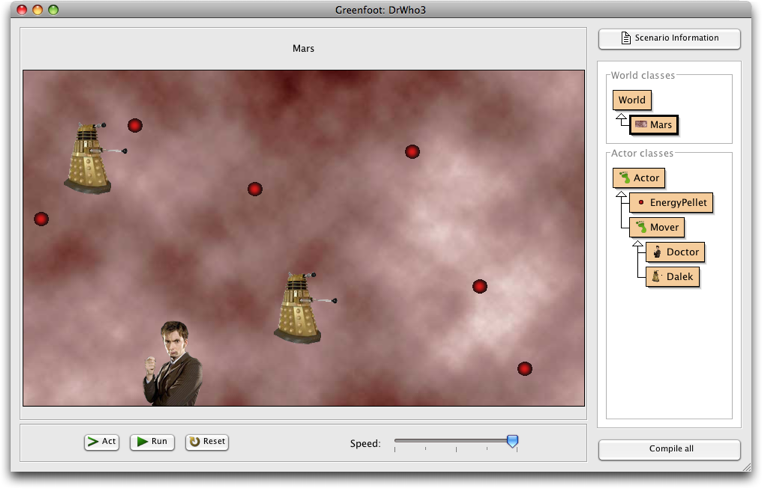
Next, we decided to change the background. We had already said a few times before that it looks a bit dark, so we had a play with Photoshop. We created an image the same size as our world (750 x 450) and used a filter (Render > Difference Clouds) to get some noise on the screen. Then we fiddled a bit with Color Balance and Hue/Saturation, and we were done. After saving the image file and using it, this is what it now looked like:
Almost done. One last thing was that we wanted the actors (the Doctor, the Dalek, and the pellets) to show up automatically, so that we don’t always have to create them new. So we opened the Mars class, and added code to the constructor to create these objects and place them into the world. The Mars constructor now looks like this:
    public Mars()
    {
        // Create a new world with 20x20 cells with a cell size of 10x10 pixels.
        super(750, 450, 1);

         addObject( new Doctor(), 200, 400);
         addObject( new Dalek(), 380, 320);
         addObject( new Dalek(), 100, 120);

         addObject( new EnergyPellet(), 150, 75);
         addObject( new EnergyPellet(), 610, 290);
         addObject( new EnergyPellet(), 25, 200);
         addObject( new EnergyPellet(), 310, 160);
         addObject( new EnergyPellet(), 520, 110);
         addObject( new EnergyPellet(), 670, 400);
    }
After every successful compile, an object of the world subclass is automatically created and shown in the main window. This includes, of course, executing that object’s constructor. The effect is that now the Doctor, two Daleks, and a few energy pellets are automatically created as well.
That’s it. We played for a while, and tried to collect all pellets without getting caught. It’s not as easy as it looks! Try it yourself.
One of the nice things about today’s session was that Sophie could do a lot on her own. I introduced a lot fewer new things, and she could practice what she had seen before: Changing the image, detecting other objects, etc. That was good.
And we got a lot of ideas for things we want to do next… But you’ve got to wait until next time to find out about those.
Summary:
Session #3
Time: 40 min (excluding 20 minutes random and unsuccessful web searching)
Result (live on the Greenfoot site): DrWho3
(Source code can be downloaded from the link above.)
this is unfolding quite nicely. it’s a beautiful thing, what you’re doing with your daughters. keep it up, Sophie!
It boggles my mind that your daughter would be so enthused about this. Even as a programmer, I remember my dad trying to teach me about the fundamentals, and me just shrieking in horror. Maybe it was the command-line and learning in C initially that did it 🙂 There’s no way I’d be able to understand the relationships between classes as Sophie has. You should be very proud.
I really like what you are doing with your daughter… Even if she doesn’t turn out to be a programmer i think that teaching you kid at such a young age to program is amazing and something that i will definitely try with my kids (when i have them, that is 🙂 )
Wonderful work Michael. Indeed you should be very proud of your daughter. The project is turning up well. I would really like to see the final product! All the best and please continue to keep us posted!
I’m really pleased that I get to see each episode of this via stumbleupon. I can’t wait to see what the 4th part is like!
I stumbled upon your blog entries last night and find it fascinating. I remember when I was little playing around on the old commodore 64 with BASIC and making fireworks and scrolling text. I really don’t care one lick about what language you use. that’s all up to you. But the fact that you and your daughter are doing something like this together is very endearing. The progect seems to be coming together very nicely and who knows, maybe the BBC will ask you and your daughter to sell it to them after your done 😉 I hope you and Sophie both enjoy this learning adventure, and keep posting I want to know how this turns out.
Think, give it a few years, and your daughter can lecture us and you can sit back and play with all the fun stuff I’m sure you have stashed in your office!
Steve
I have loved this series, interesting to look at programming from such a unique perspective. Have you had time to work on this with your daughter anymore? Would love to see what she’ll come us with next.
I appreciate what your doing with your daughter. And I think using Java with a environment such as greenfoot is a great idea since Java has a complete set of classes and functions and the IDE makes it easy to implement. I think your game approach that uses user input and actions based on them is the key. Most of use didnt like learning the basics (i actually liked it but most didnt) because we didnt see graphical results that we interacted with. We saw a command line and developed algorithms and used data and flow structures. Great job!
I teach Computer Studies at High School and am always on the lookout for new IDEs to teach programming. I think Greenfoot is an excellent environment with which to teach Java and OO concepts. Well done. However, for a beginning games programmer I think it is a bit technical. Have you looked at Game maker? The Doctor Who game could be made quite quickly using this program without having to delve too deeply into technical issues. Game maker has a drag and drop interface (as well as its own language – GML), uses OO concepts and is easy and fun to use. Regards, Peter.
Pingback: Michael’s Random Thoughts » Teaching My Daughter To Code, Part IV: Return of the Daleks
This has so much win… It’s totally awesome
This is so cool. I’m learning Java at uni using BlueJ. I’m in week 3 and I love it so far but as I have no prior experience with computers (I’m a physics major) I was worried that it would take me ages to learn anything useful. Reading this blog has made me even more hopeful and given me a better understanding of OO. Thanks. And thanks for bluej – it’s a nice tool for us older kids. 🙂
very funny and useful.
may be I will show my little brother this site
so he can make games like Sophie and learn English ^^
2 in 1
but first i have to learn all those code for myself ^^